Hi bloggy readers,
In my recent post, i've already shown you about creating a
calendar widget on your blog, which the calendar widget was provided by
Phydeaux3. For those of you who have installed this cool calendar widget and have it worked on your blog, you might also want to know how exactly to customize the style, especially the theme and colors of the
calendar widget.
Luckily, Phydeaux3 has provided the shortcut for you. And what makes me impressed with Phydeaux regarding this widget customization is, how the customization for this widget can be done in very easy and simple method, where you will only need to replace the standard CSS styling with a new one in order to get the different themes and colors. Anyway, in this article, i am gonna show you other customizations you can get for the calendar widget on your blog, which 2 of the new interfaces (Red Maroon and Orange Black) are modified by myself, the other 2 are created by Phydeaux himself.
Okay, without to much long introduction, here's i show you how.
1. Log in to Blogger
Now go to Blogger.com and sign in to your account.
2. Go to Edit HTML
In the Dashboard page of your account, now press Layout/Design > Edit HTML.
3. Find the Code
If you have installed the calendar widget on your blog, you should also find the CSS style that controls that calendar widget. Now find the CSS below (Ctrl + F):
/* Calendar
----------------------------------------------- */
/* div that holds calendar */
#blogger_calendar { margin:5px 0 0 0;width:98%;}
/* Table Caption - Holds the Archive Select Menu */
#bcaption {border:1px solid #000;padding:2px;margin:10px 0 0;background:#1F1FFF;}
/* The Archive Select Menu */
#bcaption select {border:0px;background:#1F1FFF;color:#fff;font-weight:bold;}
/* The Heading Section */
table#bcalendar thead {background:#000;}
/* Head Entries */
table#bcalendar thead tr th {width:20px;text-align:center;padding:2px; border:1px solid #000; font-family:Tahoma; font-weight:bold;color:#fff;}
/* The calendar Table */
table#bcalendar {border:1px solid #000;border-top:0; margin:0px 0 0px;width:95%;background:#fff;}
/* The Cells in the Calendar */
table#bcalendar tbody tr td {text-align:center;padding:2px;border:1px solid #000;color:#1F1FFF;}
/* Links in Calendar */
table#bcalendar tbody tr td a {font-weight:bold;color:#000;}
/* First Row Empty Cells */
td.firstCell {}
/* Cells that have a day in them */
td.filledCell {}
/* Cells that are empty, after the first row */
td.emptyCell {}
/* Cells with a Link Entry in them */
td.highlightCell {background:#ddd;border:1px outset #000}
/* Table Footer Navigation */
table#bcNavigation {width:95%;background:#1F1FFF;border:1px solid #000;border-top:0;}
table#bcNavigation a {text-decoration:none;color:#fff;}
td#bcFootPrev {width:10px;}
td#bcFootAll{text-align:center;}
td#bcFootNext {width:10px;}
ul#calendarUl {margin:5px auto 0!important;}
ul#calendarUl li a{}
4. Replace the CSS styling of calendar widget
Now, in order to replace the default interface of the calendar widget on your blog, you must replace the old CSS styling you've put in your blog template. In this step, i am gonna show you 4 new themes for the calendar widget in the form of CSS styling. After locating the CSS styling on number 3 above, now i want you to block those codes, and then replace it by using one of these new styles below. For example, if you like the calendar widget in your blog to be shown in the Dusty Blue Style, you can simply block the code on number 3, and then replace it by using the CSS styling "Dusty Blue Style" below this picture.
Dusty Blue Style

/* Calendar Dusty Blue Style
----------------------------------------------- */
/* div that holds calendar */
#blogger_calendar { margin:5px 0 0 0;padding:3px;1px solid #000;background:#FFF ; width:100%;}
/* Table Caption - Holds the Archive Select Menu */
#bcaption {border:1px outset #000;background:#CCD9FF;padding:2px;margin:10px 0 0}
/* The Archive Select Menu */
#bcaption select {background:#CCD9FF;color:#fff;font-weight:bold;border:0 solid #CCD9FF;text-align:center;}
/* The Heading Section */
table#bcalendar thead {background:#FFF2CC ;color:#111;}
/* Head Entries */
table#bcalendar thead tr th {width:20px;text-align:center;padding:2px; border:1px inset #000; font-family:Tahoma; font-weight:normal;}
/* The calendar Table */
table#bcalendar {border:1px solid #000;border-top:0; margin:0px 0 0px;width:95%;}
/* The Cells in the Calendar */
table#bcalendar tbody tr td {text-align:center;padding:2px;border:1px outset #000;}
/* Links in Calendar */
table#bcalendar tbody tr td a {font-weight:bold; color:#527DFF;}
/* First Row Empty Cells */
td.firstCell {visibility:visible;}
/* Cells that have a day in them */
td.filledCell {background:#fff;}
/* Cells that are empty, after the first row */
td.emptyCell {visibility:hidden;}
/* Cells with a Link Entry in them */
td.highlightCell {background:#FFF2CC;border:1px outset #000!important}
/* Table Navigation */
table#bcNavigation {width:95%;background:#FFF2CC;border:1px inset #000;border-top:0;color:#fff;}
table#bcNavigation a {color:#527DFF;text-decoration:none;}
td#bcFootPrev {width:10px;}
td#bcFootAll{text-align:center;}
td#bcFootNext {width:10px;}
ul#calendarUl {margin:5px auto 0!important;}
ul#calendarUl li a{ color:#527DFF}
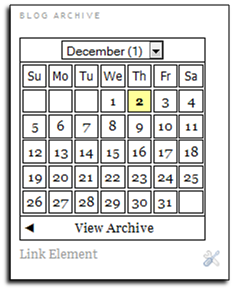
Plain White
/* Calendar Plain White
----------------------------------------------- */
/* div that holds calendar */
#blogger_calendar { margin:5px 0 0 0;width:98%;}
/* Table Caption - Holds the Archive Select Menu */
#bcaption {border:1px solid #000;padding:2px;margin:10px 0 0;background:#fff;}
/* The Archive Select Menu */
#bcaption select {border:1px solid #000;}
/* The Heading Section */
table#bcalendar thead {}
/* Head Entries */
table#bcalendar thead tr th {width:20px;text-align:center;padding:2px; border:1px solid #000; font-family:Tahoma; font-weight:normal;color:#000;}
/* The calendar Table */
table#bcalendar {border:1px solid #000;border-top:0; margin:0px 0 0px;width:95%;background:#fff;}
/* The Cells in the Calendar */
table#bcalendar tbody tr td {text-align:center;padding:2px;border:1px solid #000;color:#000;}
/* Links in Calendar */
table#bcalendar tbody tr td a {font-weight:bold;color:#000;}
/* First Row Empty Cells */
td.firstCell {visibility:visible;}
/* Cells that have a day in them */
td.filledCell {}
/* Cells that are empty, after the first row */
td.emptyCell {}
/* Cells with a Link Entry in them */
td.highlightCell {background:#FFFF99;border:1px outset #000}
/* Table Footer Navigation */
table#bcNavigation {width:95%;background:#fff;border:1px solid #000;border-top:0;}
table#bcNavigation a {text-decoration:none;color:#000;}
td#bcFootPrev {width:10px;}
td#bcFootAll{text-align:center;}
td#bcFootNext {width:10px;}
ul#calendarUl {margin:5px auto 0!important;}
ul#calendarUl li a{}
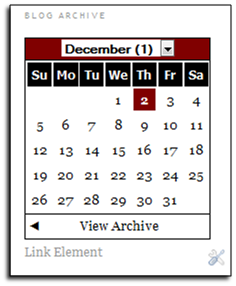
Red Maroon Style
/* Calendar Red Maroon Style
----------------------------------------------- */
/* div that holds calendar */
#blogger_calendar { margin:5px 0 0 0;width:98%;}
/* Table Caption - Holds the Archive Select Menu */
#bcaption {border:1px solid #000;padding:2px;margin:10px 0 0;background:#800000;}
/* The Archive Select Menu */
#bcaption select {border:0px;background:#fff;color:#000000;font-weight:bold;}
/* The Heading Section */
table#bcalendar thead {background:#000;}
/* Head Entries */
table#bcalendar thead tr th {width:20px;text-align:center;padding:2px; border:1px solid #000; font-family:Tahoma; font-weight:bold;color:#fff;}
/* The calendar Table */
table#bcalendar {border:1px solid #000;border-top:0; margin:0px 0 0px;width:95%;background:#fff;}
/* The Cells in the Calendar */
table#bcalendar tbody tr td {text-align:center;padding:2px;border:1px solid #fff;color:#000000;}
/* Links in Calendar */
table#bcalendar tbody tr td a {font-weight:bold;color:#fff;}
/* First Row Empty Cells */
td.firstCell {}
/* Cells that have a day in them */
td.filledCell {}
/* Cells that are empty, after the first row */
td.emptyCell {}
/* Cells with a Link Entry in them */
td.highlightCell {background:#800000;border:1px outset #000}
/* Table Footer Navigation */
table#bcNavigation {width:95%;background:#fff;border:1px solid #000;border-top:0;}
table#bcNavigation a {text-decoration:none;color:#000000;}
td#bcFootPrev {width:10px;}
td#bcFootAll{text-align:center;}
td#bcFootNext {width:10px;}
ul#calendarUl {margin:5px auto 0!important;}
ul#calendarUl li a{}
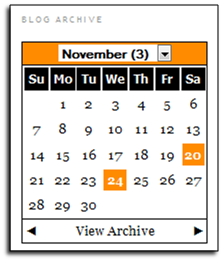
Orange Black Style
/* Calendar Orange Black Style
----------------------------------------------- */
/* div that holds calendar */
#blogger_calendar { margin:5px 0 0 0;width:98%;}
/* Table Caption - Holds the Archive Select Menu */
#bcaption {border:1px solid #000;padding:2px;margin:10px 0 0;background:#FF8C00;}
/* The Archive Select Menu */
#bcaption select {border:0px;background:#fff;color:#000000;font-weight:bold;}
/* The Heading Section */
table#bcalendar thead {background:#000;}
/* Head Entries */
table#bcalendar thead tr th {width:20px;text-align:center;padding:2px; border:1px solid #000; font-family:Tahoma; font-weight:bold;color:#fff;}
/* The calendar Table */
table#bcalendar {border:1px solid #000;border-top:0; margin:0px 0 0px;width:95%;background:#fff;}
/* The Cells in the Calendar */
table#bcalendar tbody tr td {text-align:center;padding:2px;border:1px solid #fff;color:#000000;}
/* Links in Calendar */
table#bcalendar tbody tr td a {font-weight:bold;color:#fff;}
/* First Row Empty Cells */
td.firstCell {}
/* Cells that have a day in them */
td.filledCell {}
/* Cells that are empty, after the first row */
td.emptyCell {}
/* Cells with a Link Entry in them */
td.highlightCell {background:#FF8C00;border:1px outset #000}
/* Table Footer Navigation */
table#bcNavigation {width:95%;background:#fff;border:1px solid #000;border-top:0;}
table#bcNavigation a {text-decoration:none;color:#000000;}
td#bcFootPrev {width:10px;}
td#bcFootAll{text-align:center;}
td#bcFootNext {width:10px;}
ul#calendarUl {margin:5px auto 0!important;}
ul#calendarUl li a{}
5. Save the TemplateOkay, after replacing the default CSS styling with one of those styles above, now by pressing the Save Template button, you can save the current changes you've just made in your blog template.
As you can see in your blog, it the new CSS styling works on the calendar widget, you will see that the new interface has been successfully installed into the widget.


