Blogger Widgets
Showing posts with label Widgets. Show all posts

How to Add Bookmarking Sites Widget Below the Post?


Hi bloggy readers,
For those of you bloggers who love spreading out your own written articles to the world, can now feel superior because what i am about to deliver to you in this article might blow you away, or at least, it can open wide your mind regarding how many bookmarking sites you've known so far. Yeah, that's definitely true. For some bloggers, the most utilized bookmarking sites they regularly used are coming from the recommendations of other bloggers around the blogosphere. Well, for your information, if you can dig little bit deeper around the internet, there are bunch of other useful bookmarking sites beside Digg, Del.icio.us, or Stumble Upon that their existences can't be ignored, especially for bloggers. Now, look at this cool bookmarking sites widget below.


social bookmarking sites list

As you can see, in that widget, there are lots of buttons such as BuyMe, Reddit, Simpy, Ask, Facebook, Slashdot, Backflip, Spurl, and many more that of course, will help improve your blog growth in the future. Eager to stack this bookmarking sites widget on your blog? Read the rest to find out more..

1. Create a bookmarking sites widget on WidgetBox
WidgetBox is one of the best widget providers around the internet. What they provide for bloggers are varied and can be the best landing base for those of you who love sophisticated widgets. Now go to the Widgetbox Shortlist page in order to get the generated script code for the bookmarking sites widget.

2. Enter your URL address
In the WidgetBox Shortlist page, you will be automatically provided with the configuration of the bookmarking sites widget, that can be previewed directly from the page. On the left position of the page, you will see a customization of your own widget, in this part, you will need to adjust the bookmarking sites widget by using your own blog preferences, not mine, in order to get the generated code from the widget itself.

Now in the "ShoutHome" and "URL to bookmark", enter your own blog address,(e.g., http://www.whatmakesblog.com). And then, in the "Title to Bookmark", put the title of your blog, say, Gaming Blog, Financial Blog, etc.


 the configuration of social bookmarking sites list

3. Press Get Widget
After finished editing the configuration of the bookmarking sites widget, now it's time to get the generated code from WidgetBox Shortlist widget. By pressing Get Widget, Widgetbox will automatically process your request and prompt you with the script code. After that, press copy and keep it to Notepad, later will be used again for the next step.

4. Log in to Blogger account
As usual as always, now head on first to Blogger.com and sign in to your account.

5. Go to Edit HTML
In the Dashboard, now press Layout/Design > Edit HTML.

6. Expand the widget Templates
Now, in order to place the Shortlist widget on the bottom position of article page/blog post, we must firstly expand the widget of our blog template. At the top of HTML box, now give a check mark to the small box called "Expand Widget Templates".

7. Find the Code
As i said on the step number 6 above, i am gonna show you how to place the widget on the bottom position of blog post on article page, therefore, we need to firstly locate the exact location of the bottom post area. Now find the code below (Ctrl + F).

Anyway, i am currently using a Minima template for a testing blog, so if you are using other template, my best suggestion for you is to find the footer part of the post in your blog template. The code that controls this part might have similar code with the one from Minima template.


<div class='post-footer'>

8. Paste the Script
Okay, after locating the code section on number 7 above, now paste the script code of widget before the code <div class='post-footer'>.

9. Save the change
Okay, now that new widget is ready to be shown publicly on your blog. By pressing the Save Template button, now you can save the current changes in your blog template.


social bookmarking sites list

As you can see in your blog, on the bottom position of each post, you will see bunch of bookmarking sites buttons that hopefully can really help increase the popularity of your blog around the blogosphere in the future.
Share

Popular Posts Plugin as a Great Addition on Blogger Machine


Hi bloggy readers,
One of many ways to drive visitor's attention to visit some of our best articles in our blog, is by showing them about the popularity of those articles with popular posts plugin. As many of you know, the popularity of blog articles can be shown either by the number of comments we received from the visitors, or by the total number of visits we got on our blog articles. Apparently, since we don't know how exactly to show to the visitors regarding the exact number of visits from our article, then there is no other benchmark we can use in this case, except on the total number of comments we received in each post. But, when it comes to Blogger Team, that case can be an exception. With their advanced method in updating or upgrading their own machine, now the popular posts plugin can really use the total number of visits as the popularity benchmark.

Popular posts plugin on Blogger, which officially developed by Blogger Team, has become one of many "must have" widgets for those of you who want to show off, or maybe just to lead visitors to visit some of your articles that are considered as the best articles in your blog, either by yourself or blog visitors. By stacking this popular posts plugin can also help improve the number of pageviews on your blog. So, i strongly suggest you to begin adding this popular posts plugin to your blog.

1. Enter to your Blogger account
As usual, now head on to Blogger.com and sign in to your account.

2. Go to Page Element
After landing to the Dashboard, now pick one of your blogs you want to add with the Popular Post widget, and then press the Layout/Design button.

3. Add a Gadget
Since we all know that popular posts plugin has been officially added by Blogger Team, then we don't need to find the script code of popular posts plugin on other blogs. In the Page Element, now pick one area in your blog layout, and then press the link called Add a Gadget. On top of the widget options, you will see the widget popular posts plugin has been automatically added as a new addition on Blogger official widget, now pick that option.

4. Configure the popular posts plugin
After pressing the option popular posts plugin, now you will be shown with the configuration section of the widget, now configure the widget in this page. I just found out that popular posts plugin from Blogger also offers you the option to display the thumbnails and also the snippets (summaries) of the related posts (what a cool widget!).

5. Press the Save button
After finished editing the configuration of your popular posts plugin, now press the Save button.

As you can see in your blog, if you've ticked the option thumbnails and the snippets, the popular posts plugin will display you the related image on the article (thumbnails) along with the summaries of the articles. Awesome! 

Share

Customizing the Calendar Widget fro Phydeaux3 with New CSS Styles?


Hi bloggy readers,

In my recent post, i've already shown you about creating a calendar widget on your blog, which the calendar widget was provided by Phydeaux3. For those of you who have installed this cool calendar widget and have it worked on your blog, you might also want to know how exactly to customize the style, especially the theme and colors of the calendar widget.

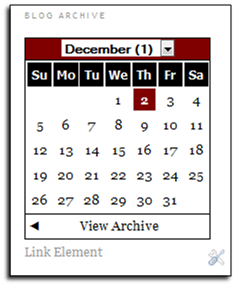
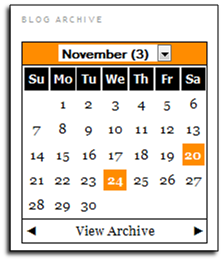
Luckily, Phydeaux3 has provided the shortcut for you. And what makes me impressed with Phydeaux regarding this widget customization is, how the customization for this widget can be done in very easy and simple method, where you will only need to replace the standard CSS styling with a new one in order to get the different themes and colors. Anyway, in this article, i am gonna show you other customizations you can get for the calendar widget on your blog, which 2 of the new interfaces (Red Maroon and Orange Black) are modified by myself, the other 2 are created by Phydeaux himself.


calendar widget for blog and website

Okay, without to much long introduction, here's i show you how.

1. Log in to Blogger
Now go to Blogger.com and sign in to your account.

2. Go to Edit HTML
In the Dashboard page of your account, now press Layout/Design > Edit HTML.

3. Find the Code
If you have installed the calendar widget on your blog, you should also find the CSS style that controls that calendar widget. Now find the CSS below (Ctrl + F):


/* Calendar
----------------------------------------------- */


/* div that holds calendar */
#blogger_calendar { margin:5px 0 0 0;width:98%;}


/* Table Caption - Holds the Archive Select Menu */
#bcaption {border:1px solid #000;padding:2px;margin:10px 0 0;background:#1F1FFF;}


/* The Archive Select Menu */
#bcaption select {border:0px;background:#1F1FFF;color:#fff;font-weight:bold;}


/* The Heading Section */
table#bcalendar thead {background:#000;}


/* Head Entries */
table#bcalendar thead tr th {width:20px;text-align:center;padding:2px; border:1px solid #000; font-family:Tahoma; font-weight:bold;color:#fff;}


/* The calendar Table */
table#bcalendar {border:1px solid #000;border-top:0; margin:0px 0 0px;width:95%;background:#fff;}


/* The Cells in the Calendar */
table#bcalendar tbody tr td {text-align:center;padding:2px;border:1px solid #000;color:#1F1FFF;}


/* Links in Calendar */
table#bcalendar tbody tr td a {font-weight:bold;color:#000;}


/* First Row Empty Cells */
td.firstCell {}


/* Cells that have a day in them */
td.filledCell {}


/* Cells that are empty, after the first row */
td.emptyCell {}


/* Cells with a Link Entry in them */
td.highlightCell {background:#ddd;border:1px outset #000}


/* Table Footer Navigation */
table#bcNavigation {width:95%;background:#1F1FFF;border:1px solid #000;border-top:0;}
table#bcNavigation a {text-decoration:none;color:#fff;}
td#bcFootPrev {width:10px;}
td#bcFootAll{text-align:center;}
td#bcFootNext {width:10px;}
ul#calendarUl {margin:5px auto 0!important;}
ul#calendarUl li a{}

4. Replace the CSS styling of calendar widget
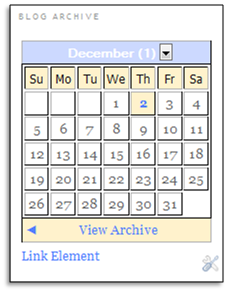
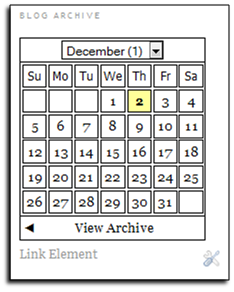
Now, in order to replace the default interface of the calendar widget on your blog, you must replace the old CSS styling you've put in your blog template. In this step, i am gonna show you 4 new themes for the calendar widget in the form of CSS styling. After locating the CSS styling on number 3 above, now i want you to block those codes, and then replace it by using one of these new styles below. For example, if you like the calendar widget in your blog to be shown in the Dusty Blue Style, you can simply block the code on number 3, and then replace it by using the CSS styling "Dusty Blue Style" below this picture.

Dusty Blue Style
/* Calendar Dusty Blue Style
----------------------------------------------- */

/* div that holds calendar */
#blogger_calendar { margin:5px 0 0 0;padding:3px;1px solid #000;background:#FFF ; width:100%;}
/* Table Caption - Holds the Archive Select Menu */
#bcaption {border:1px outset #000;background:#CCD9FF;padding:2px;margin:10px 0 0}
/* The Archive Select Menu */
#bcaption select {background:#CCD9FF;color:#fff;font-weight:bold;border:0 solid #CCD9FF;text-align:center;}
/* The Heading Section */
table#bcalendar thead {background:#FFF2CC ;color:#111;}
/* Head Entries */
table#bcalendar thead tr th {width:20px;text-align:center;padding:2px; border:1px inset #000; font-family:Tahoma; font-weight:normal;}
/* The calendar Table */
table#bcalendar {border:1px solid #000;border-top:0; margin:0px 0 0px;width:95%;}
/* The Cells in the Calendar */
table#bcalendar tbody tr td {text-align:center;padding:2px;border:1px outset #000;}
/* Links in Calendar */
table#bcalendar tbody tr td a {font-weight:bold; color:#527DFF;}
/* First Row Empty Cells */
td.firstCell {visibility:visible;}
/* Cells that have a day in them */
td.filledCell {background:#fff;}
/* Cells that are empty, after the first row */
td.emptyCell {visibility:hidden;}
/* Cells with a Link Entry in them */
td.highlightCell {background:#FFF2CC;border:1px outset #000!important}
/* Table Navigation */
table#bcNavigation  {width:95%;background:#FFF2CC;border:1px inset #000;border-top:0;color:#fff;}
table#bcNavigation a {color:#527DFF;text-decoration:none;}
td#bcFootPrev {width:10px;}
td#bcFootAll{text-align:center;}
td#bcFootNext {width:10px;}
ul#calendarUl {margin:5px auto 0!important;}
ul#calendarUl li a{ color:#527DFF}

Plain White
/* Calendar Plain White
----------------------------------------------- */


/* div that holds calendar */
#blogger_calendar { margin:5px 0 0 0;width:98%;}


/* Table Caption - Holds the Archive Select Menu */
#bcaption {border:1px solid #000;padding:2px;margin:10px 0 0;background:#fff;}


/* The Archive Select Menu */
#bcaption select {border:1px solid #000;}


/* The Heading Section */
table#bcalendar thead {}


/* Head Entries */
table#bcalendar thead tr th {width:20px;text-align:center;padding:2px; border:1px solid #000; font-family:Tahoma; font-weight:normal;color:#000;}


/* The calendar Table */
table#bcalendar {border:1px solid #000;border-top:0; margin:0px 0 0px;width:95%;background:#fff;}


/* The Cells in the Calendar */
table#bcalendar tbody tr td {text-align:center;padding:2px;border:1px solid #000;color:#000;}


/* Links in Calendar */
table#bcalendar tbody tr td a {font-weight:bold;color:#000;}


/* First Row Empty Cells */
td.firstCell {visibility:visible;}


/* Cells that have a day in them */
td.filledCell {}


/* Cells that are empty, after the first row */
td.emptyCell {}


/* Cells with a Link Entry in them */
td.highlightCell {background:#FFFF99;border:1px outset #000}


/* Table Footer Navigation */
table#bcNavigation  {width:95%;background:#fff;border:1px solid #000;border-top:0;}
table#bcNavigation a {text-decoration:none;color:#000;}
td#bcFootPrev {width:10px;}
td#bcFootAll{text-align:center;}
td#bcFootNext {width:10px;}
ul#calendarUl {margin:5px auto 0!important;}
ul#calendarUl li a{}


Red Maroon Style
/* Calendar Red Maroon Style
----------------------------------------------- */


/* div that holds calendar */
#blogger_calendar { margin:5px 0 0 0;width:98%;}


/* Table Caption - Holds the Archive Select Menu */
#bcaption {border:1px solid #000;padding:2px;margin:10px 0 0;background:#800000;}


/* The Archive Select Menu */
#bcaption select {border:0px;background:#fff;color:#000000;font-weight:bold;}


/* The Heading Section */
table#bcalendar thead {background:#000;}


/* Head Entries */
table#bcalendar thead tr th {width:20px;text-align:center;padding:2px; border:1px solid #000; font-family:Tahoma; font-weight:bold;color:#fff;}


/* The calendar Table */
table#bcalendar {border:1px solid #000;border-top:0; margin:0px 0 0px;width:95%;background:#fff;}


/* The Cells in the Calendar */
table#bcalendar tbody tr td {text-align:center;padding:2px;border:1px solid #fff;color:#000000;}


/* Links in Calendar */
table#bcalendar tbody tr td a {font-weight:bold;color:#fff;}


/* First Row Empty Cells */
td.firstCell {}


/* Cells that have a day in them */
td.filledCell {}


/* Cells that are empty, after the first row */
td.emptyCell {}


/* Cells with a Link Entry in them */
td.highlightCell {background:#800000;border:1px outset #000}


/* Table Footer Navigation */
table#bcNavigation {width:95%;background:#fff;border:1px solid #000;border-top:0;}
table#bcNavigation a {text-decoration:none;color:#000000;}
td#bcFootPrev {width:10px;}
td#bcFootAll{text-align:center;}
td#bcFootNext {width:10px;}
ul#calendarUl {margin:5px auto 0!important;}
ul#calendarUl li a{}

Orange Black Style
/* Calendar Orange Black Style
----------------------------------------------- */


/* div that holds calendar */
#blogger_calendar { margin:5px 0 0 0;width:98%;}


/* Table Caption - Holds the Archive Select Menu */
#bcaption {border:1px solid #000;padding:2px;margin:10px 0 0;background:#FF8C00;}


/* The Archive Select Menu */
#bcaption select {border:0px;background:#fff;color:#000000;font-weight:bold;}


/* The Heading Section */
table#bcalendar thead {background:#000;}


/* Head Entries */
table#bcalendar thead tr th {width:20px;text-align:center;padding:2px; border:1px solid #000; font-family:Tahoma; font-weight:bold;color:#fff;}


/* The calendar Table */
table#bcalendar {border:1px solid #000;border-top:0; margin:0px 0 0px;width:95%;background:#fff;}


/* The Cells in the Calendar */
table#bcalendar tbody tr td {text-align:center;padding:2px;border:1px solid #fff;color:#000000;}


/* Links in Calendar */
table#bcalendar tbody tr td a {font-weight:bold;color:#fff;}


/* First Row Empty Cells */
td.firstCell {}


/* Cells that have a day in them */
td.filledCell {}


/* Cells that are empty, after the first row */
td.emptyCell {}


/* Cells with a Link Entry in them */
td.highlightCell {background:#FF8C00;border:1px outset #000}


/* Table Footer Navigation */
table#bcNavigation {width:95%;background:#fff;border:1px solid #000;border-top:0;}
table#bcNavigation a {text-decoration:none;color:#000000;}
td#bcFootPrev {width:10px;}
td#bcFootAll{text-align:center;}
td#bcFootNext {width:10px;}
ul#calendarUl {margin:5px auto 0!important;}
ul#calendarUl li a{}

5. Save the TemplateOkay, after replacing the default CSS styling with one of those styles above, now by pressing the Save Template button, you can save the current changes you've just made in your blog template.

As you can see in your blog, it the new CSS styling works on the calendar widget, you will see that the new interface has been successfully installed into the widget.
Share

Flickr Badge Helps You Show off Beautiful Scenery Pictures on Your Blog


Hi bloggy readers,

Displaying the collection of our beautiful scenery pictures to the visitors through our blog can be done in elegant way by adding a slideshow widget inside our blog. Flickr badge plugin is one of the great slide show widget that can show off our recent beautiful scenery pictures from our Flickr account directly to the visitors of our blog in more sophisticated way than using other slide show widget.

Even though Flickr badge is a flash-based widget, it doesn't really affect and burden the page loading of our blog. So, if you want to start showing off your beautiful scenery pictures to the visitors, Flickr badge can be your answer.

1. Create your own Flickr account
In order to be able to get the Flickr badge, you must firstly create your own account on Flickr.com website as the first procedure.

2. Get the Flickr badge
After finished signing up to the website, now it's time to create your own Flickr badge. Now go to the Flickr badge page.

3. Choose your Flickr badge
In the Flickr badge page, you will be directly asked to choose what kind of badge you want to embed on your blog. In this page, you will only be given 2 choices, HTML-based Flickr badge and Flash Flickr Badge. I personally like the second option, the flash one, because it looks more elegant and cool in our blog. But, it's up to you. Okay, if you have made up your mind, now press the Next:Choose Content.

4. Choose what photos you want to display on Flickr badge
In the next step, you will be given the choices whether to display your own beautiful scenery pictures and videos, or to display other people's photos on your Flickr badge. If you haven't uploaded your own beautiful scenery pictures to your Flickr account, you can opt to second option, which is to display other people's photos. After that, press Next:Colors.

5. Customize the interface of your badge
On the next step, you will be given a full authority to customize the interface of the Flickr widget. In this page, you can pick the color of the widget, add a background or remove the existing border. Now press Next:Preview and Get Code.

6. Get the script code
In the new page, you will be shown that your Flickr badge has been successfully created. To begin showing off your beautiful scenery pictures with this widget, now get the script code on the bottom position of the page and press copy.

7. Enter to your Blogger account
Now off to Blogger.com and log in to your account.

8. Go to Page Element
In the Dashboard, now press Layout/Design of your chosen blog, and you will be brought to the Page Element section.

9. Press Add a Gadget
In the Page Element, now pick any area in your blog layout, and then press Add a Gadget > HTML/Javascript as a platform.

10. Paste the Script code and press Save
In the HTML box, now paste the script you've got and then press the save button.

Now let stack all of the great and beautiful scenery pictures with you in it and let visitors know that you have had the best holiday ever.
 
Share

Mini Web Browser Widget Added to your Blog


Hi bloggy readers,
Have you ever imagined that inside your blog, you can browse to another mini web browser directly from your blog? Maybe some of you might be baffled to hear with what i am saying right now. How come we can browse to another blog/website, when we are currently browsing inside our blog? Well, if you think i'm crazy with that idea, you have to blame Bitty Browser for providing this awesome mini web browser widget.


mini web browser plugin on blogger
 
With Bitty Browser, you can now have a full control of mini web browser to navigate to another website, directly from your blog.

Bitty Browser also provides other great features of mini web browser that can improve the sophistication of your blog interface even better this time. You can check Technorati website, del.icio.us, Flickr, or even Google in much simpler and smaller version on your blog. Interested with this mini web browser widget? Let's get straight to the article.

1. Go to Widgetbox.Com website
In order to install the Bitty Browser mini web browser widget in your blog, you must firstly go to the Widgetbox.com which also facilitates this mini web browser widget for you.

2. Configure the widget
When landing to the Bitty Browser widget page, now you can begin configuring the mini web browser widget that suits to your preferences. In this part, you can set the title bar, the search bar, and last but not least, the default page you really want to use for this mini web browser widget (Google page, Technorati, Flickr, del.icio.us, and many more).

3. Get the widget code of mini web browser
After finished customizing the look for the mini web browser widget, now it's time to get the generated widget code. Now press the button Get Widget on the bottom position of the configuration of mini web browser. By doing so, you will be prompted with a new small window that generates you the code snippet of the widget.

4. Copy the widget code
As you can see in that small widget window, there is a box contains a script code for the mini web browser widget. To copy the whole script code, you can simply press the button Copy. Without your consciousness, the whole script code has been copied to the clipboard.

5. Enter to Blogger account
To install this widget, now head on to Blogger.com and sign in to your account.

6. Go to Page Element
In the Dashboard, now press the button Layout/Design on a blog you want to add with this Bitty Browser widget, you will be landed to Page Element section.

7. Paste the script code
In the Page Element, now pick any area in your blog layout for the Bitty mini web browser widget, and then press Add a Gadget > HTML/Javascript" as a platform for the mini web browser widget. In the prompted window, now paste the script code the HTML box, and then, save the widget by pressing the Save button.

As you can see in your blog, if the script code works perfectly, a new mini web browser will be shown in the sidebar of your blog.

Okay, that's it for now. See you at my next article. 
 
Share

Show Off Your Landscape Photography with Panoramio Widget


Hi bloggy readers,
The best way to show off your landscape photography of places in your far-far away journey, is by displaying those photos with a great widget called Panoramio Widgets. Recently, Panorama Team has developed this new great addition for those of you bloggers who currently are building a travel or holiday related blogs. This widget is no doubt will increase the sophistication of your blog interface even better, so i am sure that you may find this widget can be so helpful for all of you who like sliding show landscape photography on your blog.


Actually, the steps to stack this landscape photography widget on your blog are quite simple, you can simply put the iframe script code provided by Panoramio Team in the new gadget via Page Element mode. Interested to install this landscape photography gadget? Just read the post.

1. Log in to your Blogger Account
Go to Blogger.com and log in to your Blogger account.

2. Go to Page Element
In the Dashboard, now press Layout/Design of your chosen blog. You will be automatically directed to the Page Element section of your blog.

3. Add a Gadget
After landing to the Page Element, now find a great spot for the Panoramio Widget in your blog layout, and then press Add a Gadget > HTML/Javascript.

4. Paste the Widget code
Now copy the iframe code below with your mouse cursor, and paste it in the HTML widget box.
<iframe src="http://www.panoramio.com/wapi/template/slideshow.html?tag=sanfrancisco&width=450&height=400&delay=6.5" frameborder="0" width="450" height="400" scrolling="no" marginwidth="0" marginheight="0"> </iframe>

5. Adjust the Widget size
Okay, i assume that right now, the sidebar area in your blog has already been set with a certain size, say, 220px. But apparently, the Panoramio landscape photography gadget you are about to install has currently been set in 450px width. That's why, now we may need to adjust the value that controls the width size of the widget. Now, i want you to set a new size to the landscape photography widget by changing the value 450 with 220 (if your blog sidebar has a current width size 220px). Look at the red code below:
<iframe src="http://www.panoramio.com/wapi/template/slideshow.html?tag=sanfrancisco&width=450&height=400&delay=6.5" frameborder="0" width="450" height="400" scrolling="no" marginwidth="0" marginheight="0"> </iframe>

6. Save the widget
Now, save the landscape photography widget by pressing the Save button.

As you can see on your blog, this new Panoramio landscape photography widget has been added on your blog sidebar with a fixed width size. Anyway, if you are keen to know how to customize this landscape photography widget, you can head on to Panoramio Widget API documentations to get further detail information. Enjoy!
 
Share

How to Analyze IP Traffic of Visitors in Our Blog?


Hi bloggy readers,

For many bloggers, checking blog and IP Traffic of visitors can be such a routine activity that consumes lots of their time, well, it happens to me also, and a lot. Every single day, when i woke up in the morning, i just couldn't help myself to start opening the Sitemeter webstat (site traffic analyzer) just to monitor how many visitors that have visited my blog from the morning until midnight. I know that, this can be a little bit wacko for some of you who are not a blogger, but as a blogger, analyzing blog traffic will always be on the top priority in our to-do list, even if we don't have a to-do list.

Anyway, finding information about who have been visiting our blog (i.e., IP Traffic) can also hold the important role in analyzing our blog traffic more thoroughly. Well, that's because, by knowing about all the data, such as visitor jumping pages, entering pages, browsing length, region/area where visitors came from, and other important data, can help us improve our blog traffic even better in the future.

Monitor IP Traffic of your Blog Visitors with IP Tracer

As i searched around internet, i just discovered one great and useful widget that does everything as i said earlier in this post, to track IP Traffic from visitors data in a real-time mode and it's called Feedjit. By adding this widget in your blog, can deliver you the newest data regarding the IP Traffic of visitors of your blog directly from the sidebar of your blog. Okay, interested to nail this Feedjit IP Traffic widget into your blog? Let's get straight to the article.

1. Go to Feedjit website
Firstly, now head on to FeedJit website to start getting this IP Traffic widget.

2. Sign up to Feedjit
As soon as you get to that website, now scroll the page down and find the link called "Click here to sign up for Feedjit Pro....".

3. Choose your Feedjit account
In the new page, you will be provided with 3 choices of FeedJit accounts, such as: Feedjit Completely Free, Feedjit Advanced, and Feedjit Pro. I suggest you to pick the first option, FeedJit Completely Free account because it's free to use the service without splashing any cash.

Monitor IP Traffic of your Blog Visitors with IP Tracer

4. Customize the appearance of the widget
After choosing your FeedJit account, you will be brought to the new page regarding the configuration of your widget. In this page, you can set up your widget that suits to your preferences, such as customizing the color of your widget, setting up the number of visitors in the widget and visitors jumping page, IP Traffic, and other stuff.

Monitor IP Traffic of your Blog Visitors with IP Tracer

5. Press the "Go" button
Okay, after finished setting up your widget, now press the button "Go" and don't forget to pick your blog platform (Blogger, Wordpress, Typepad, etc) before leaving this page.

6. Install the widget into your blog
In the new page, you will be prompted with the option to start adding the FeedJit IP Traffic widget into your blog, or go back to the customization page. To install the widget, now press the button "Click to open a new window and install on Blogger".

Monitor IP Traffic of your Blog Visitors with IP Tracer

7. Install the widget in your blog layout
As soon as you press the "Click to open a new window and install on Blogger" button, you will be automatically directed into your blog layout or Page Element mode. Now pick the best location for the FeedJit IP Traffic widget in your blog layout, and then press the Save button.

In your blog, you will see that FeedJit IP Traffic widget has been successfully added in your blog. From now on. you can feel relief to check your blog traffic directly from your blog.

Okay, that's it for now. Stick to this blog to get more widgets coming up. 

Share

Related Posts Plugin for WordPress, Blogger...
 
Amazing Cats Collection © 2011 | Template by Blogger Templates Gallery collaboration with Life2Work
