Blogger officially supports 'after the jump' summaries. You can insert a jump break anywhere in a post to make it short on the blog homepage. The part after the jump break will be visible only when user will click on the Jump Break or Read More link. In this tutorial, we'll add some coding in the template HTML. After that, you'd be able to change the font, color or even the background color of the Jump Break or Read More from the Template Designer.
Please don't use this tutorial on your blog if you're not using 'Simple' Blogger template, otherwise you might get an error!
This tutorial is also available in video form at my YouTube channel:
http://www.youtube.com/user/BloggerEngineer
What is Jump Break or Read More Link?
If you don't know anything about Jump Break or Read More links, please read the following article in the official Blogger help.
Creating 'After the jump' summaries
Steps
Follow these simple steps to complete this Blogspot tutorial.
- Log in to your Blogger account.
- Open 'Design' tab then 'Edit HTML' tab.
- Scroll down a bit and you'll see this code:
Tip: Windows users can press 'Ctrl + f' to fing the code./* Variable definitions ==================== - Replace the above code with the following code:
/* Variable definitions ==================== <Group description="Read More" selector=".jump-link"> <Variable name="rm.font" description="Font" type="font" default="normal normal 12px Arial, Tahoma, Helvetica, FreeSans, sans-serif" value="normal normal 12px 'Trebuchet MS',Trebuchet,Verdana,sans-serif"/> <Variable name="rm.color" description="Color" type="color" default="#f9f9f9" value="#eeeeee"/> <Variable name="rm.h.color" description="Hover Color" type="color" default="#eeeeee" value="#eeeeee"/> </Group> <Group description="Read More Background" selector=".jump-link"> <Variable name="rm.bg.color" description="Color [www.betatemplates.com]" type="color" default="#000000" value="#000000"/> </Group> - After that, find
]]></b:skin>and replace it with the following code:
.jump-link { float: right; font: $(rm.font); background: $(rm.bg.color); } .jump-link a, .jump-link a:visited { color: $(rm.color); } .jump-link a:hover { color: $(rm.h.color); } ]]></b:skin> - Now, save your template.
- After saving template, open the 'Template Designer'.
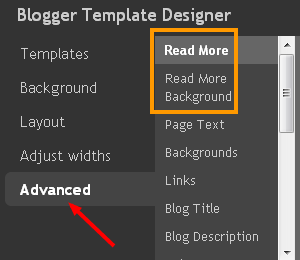
- In 'Template Designer', expand the Advanced tab and you'll see 'Read More' and 'Read More Background' tabs at the top.
- You can change the font, color and background color and instantly see the preview. However, change in 'Hover Color' can't be previewed instantly. You'd have to open the blog and bring your mouse over the Jump Break or Read More link to see the 'Hover Color' effect.
- After customizing the Jump Break or Read More link, click 'APPLY TO BLOG' link to save your changes.


0 comments:
Post a Comment
If you like this post